...
This page covers using ControlRoom VR with Ableton Live.
This guide assumes that you have already:
If you have not completed the above steps, please visit the ControlRoom Setup Overview
Overview
| Info |
|---|
ControlRoom connects simultaneously with Ableton Live in 3 ways:Native Control Surface (VR Console for Ableton’s built-in mixer) General MIDI Device (Map VR MIDI tools to anything in Ableton) Direct Connection to ControlRoom AU/VST3 Plugins (VR Spatial Mixer and Plugin Tablet)
|
...
Detailed Setup Instructions
| Note |
|---|
Please note, ControlRoom Hub must be running to maintain the connection with Ableton Live. It can be minimized, but not closed. |
Use the VR Console to control the Ableton mixer
The VR console in ControlRoom is your home base for interacting with your Ableton session. It provides access to Ableton’s built in Volume, Pan, Solo, Mute, and Sends. You can navigate through the tracks in your session using the Nudge and Bank buttons, and control the main functions of the Ableton transport.
...
| Expand |
|---|
| title | Step Two: Use the Console to control your Ableton session |
|---|
|
By using the various sections of the console, you can control Ableton’s built in mixer. Functions outlined below: Ableton Parameter | Console Control |
|---|
Volume | Large Fader | Pan | Pan Knob | Solo | S button | Mute | M button | Sends | Select Channel Mode A-E for sends 1-5. This will switch each track’s large fader to control the send level. (Select Vol to return to normal console mode.) | Master Volume | Master fader at the far right side of the Console | Transport | Transport section at the front of the console. Play and stop can also be controlled at any time using the large transport button on your left wrist FF and RW will jump between Ableton marker points Record will start recording. (if automation record is turned on in Ableton, any control movements will write automation in Ableton) |
|
Spatial Mixer and Plugin Tablet
...
Every instance of the ControlRoom Channel AU/VST3 plugin can be controlled from VR with the Spatial Mixer and Plugin Tablet. This provides powerful control over the plugin from within VR, including the Compressor, EQ, Spatial Panner, and output level.
The ControlRoom Channel and Master plugins are available for purchase from persp3ctive.com
...
| Expand |
|---|
| title | Step Four: Turn on the Plugin Tablet |
|---|
|
In VR, press the menu button on your left controller to bring up the menu, then select the Tools page, and turn on the Plugin Tablet. Press the menu button at the top right of the tablet to select the track you’d like to control with the Plugin Tablet. Close this menu when you are finished, and return back to it any time you’d like to display different tracks. Use the buttons along the top of the tablet to switch between Compressor and EQ control over the selected track.
EQ ControlEach of the 10 bands of the EQ will appear front to back as colored lines. The white line at the rear is the overall EQ curve, summed from the combination of the 10 adjustable bands. Individual bands can be toggled on/off using the X or A button when hovering over each point, or while grabbing it with the trigger. Each EQ band’s point can be moved up/down for Gain and left/right for Frequency. Push the joysticks up/down while grabbing a point to adjust that band’s Q value.
Compressor ControlAll parameters of the Channel compressor are shown here. Toggle pyramid on/off by selecting the pyramid icon at the top right of the tablet. The pyramid allows you to control Ratio, Threshold, Attack Time, and Release Time Height of the tip of the pyramid for Ratio Height of the middle line for Threshold Horizontal position of the bottom left and right sides for Attack Time and Release time, respectively.
|
There are numerous tools in ControlRoom that can be mapped to control any parameter in Ableton, including your favorite third party plugins. Follow the steps below for an example of how to map the FX Cube to a few plugin parameters in Ableton.
...
| Expand |
|---|
| title | Step Four: Put Ableton in Midi Map mode, and map the parameters |
|---|
|
Click the Pitch parameter in the Grain Delay window. This selects it with a rectangle. Switch back to the Hub, and click the first Send CC button to map the X axis to Grain Delay Pitch Switch back to Ableton, and click the Frequency parameter in the Grain Delay Window to select it Switch back to the Hub, and click the second Send CC button to map the Y axis to Grain Delay Frequency Follow suit to map the reverb.. In Ableton, click the Reverb Dry/Wet parameter to select it, and in the Hub click the third Send CC button to map the Z axis to Reverb Dry/Wet
In Ableton, you should now see three items in the Midi Mappings panel on the left. Exit Midi Map mode by clicking the MIDI button at the top right of the Ableton window, or by using the keyboard shortcuts Command-M (Mac) or Control-M (Windows)
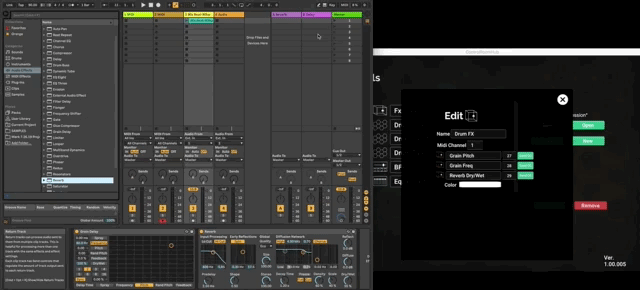 Remember to press the PURPLE panel when Midi mapping. For example, if you are MIDI-mapping pitch in the Grain-Delay, press the box that includes the current pitch, not the box that says, “Pitch.” |
...
| Note |
|---|
We recommend that you save your ControlRoom Hub session early and often any time you are mapping midi tools to Ableton. |
...
TL;DR
Ensure you have completed all the steps in the setup process
Use the VR Console to control Ableton’s built-in mixer
Use the VR Spatial Mixer to control the Channel and Master AU/VST3 plugins
Use the Hub to manually map MIDI tools to control anything in Ableton
...
| Info |
|---|
Still have questions about setting up the Hub or have suggestions about how we could improve this page? Try our customer service portal. |
Related articles
| Filter by label (Content by label) |
|---|
| showLabels | false |
|---|
| max | 5 |
|---|
| spaces | com.atlassian.confluence.content.render.xhtml.model.resource.identifiers.SpaceResourceIdentifier@105c4 |
|---|
| showSpace | false |
|---|
| sort | title |
|---|
| type | page |
|---|
| labels | kb-how-to-article |
|---|
| cql | label = "kb-how-to-article" and type = "page" and space = "CRS" |
|---|
|