Versions Compared

Key

  • This line was added.
  • This line was removed.
  • Formatting was changed.

...

Expand
titleStep Two: Use the Console to control your Ableton session

By using the various sections of the console, you can control Ableton’s built in mixer. Functions outlined below:

Ableton Parameter

Console Control

Volume

Large Fader

Pan

Pan Knob

Solo

S button

Mute

M button

Sends

Select Channel Mode A-E for sends 1-5. This will switch each track’s large fader to control the send level.

(Select Vol to return to normal console mode.)

Master Volume

Master fader at the far right side of the Console

Transport

Transport section at the front of the console.

Play and stop can also be controlled at any time using the large transport button on your left wrist

FF and RW will jump between Ableton marker points

Record will start recording. (if automation record is turned on in Ableton, any control movements will write automation in Ableton)

Spatial Mixer and Plugin Tablet

...

Expand
titleStep Four: Put Ableton in Midi Map mode, and map the parameters
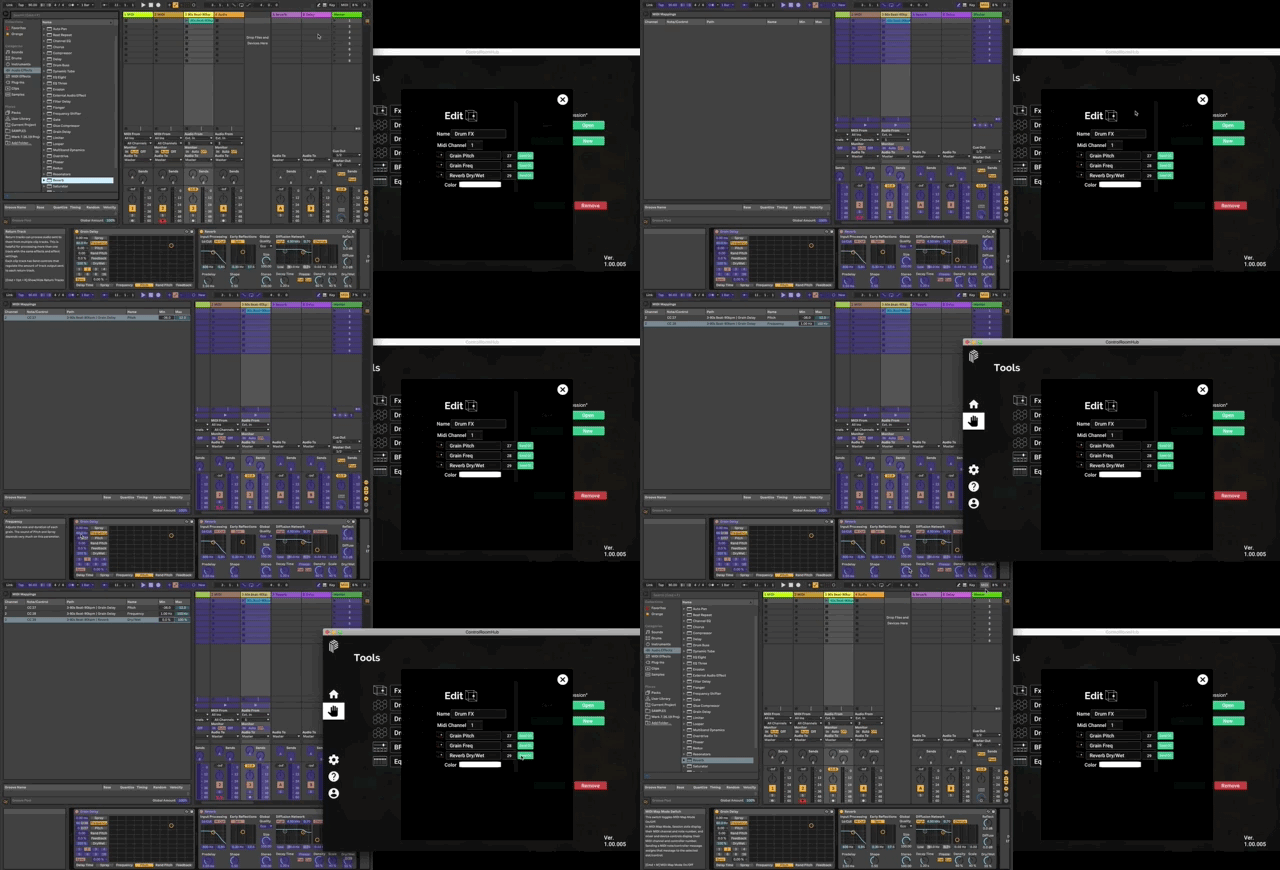
  • Back in Ableton, switch to Midi Map mode by clicking the MIDI button at the top right of the Ableton window, or by using the keyboard shortcuts Command-M (Mac) or Control-M (Windows)

  • Click the Pitch parameter in the Grain Delay window. This selects it with a rectangle.

  • Switch back to the Hub, and click the first Send CC button to map the X axis to Grain Delay Pitch

  • Switch back to Ableton, and click the Frequency parameter in the Grain Delay Window to select it

  • Switch back to the Hub, and click the second Send CC button to map the Y axis to Grain Delay Frequency

  • Follow suit to map the reverb.. In Ableton, click the Reverb Dry/Wet parameter to select it, and in the Hub click the third Send CC button to map the Z axis to Reverb Dry/Wet

  • In Ableton, you should now see three items in the Midi Mappings panel on the left.

    • If you do not, please review the previous steps to be sure you haven’t missed anything.

  • Exit Midi Map mode by clicking the MIDI button at the top right of the Ableton window, or by using the keyboard shortcuts Command-M (Mac) or Control-M (Windows)

Remember to press the PURPLE panel when Midi mapping. For example, if you are MIDI-mapping pitch in the Grain-Delay, press the box that includes the current pitch, not the box that says, “Pitch.”

Expand
titleStep Five: Open the FX cube in VR and have fun

Once you have mapped the three parameters, this mapped tool will be available to you in ControlRoom VR.

  • In VR, press the menu button on your left controller to bring up the menu, then select the Tools page, and turn on the FX cube you just mapped, which should be named Drum FX

  • Start playback either on the Console, or using your left wrist transport

  • Move the ball in the FX cube around to control all three of those parameters simultaneously

...