Versions Compared

Key

  • This line was added.
  • This line was removed.
  • Formatting was changed.

...

...

...

...

...

...

...

...

Image Modified

This page covers using ControlRoom VR with Ableton Live.

This guide assumes that you have already:

If you have not completed the above steps, please visit the ControlRoom Setup Overview

Overview

Info

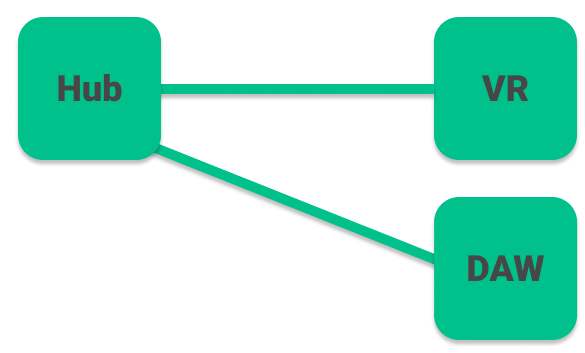
ControlRoom VR connects simultaneously with Ableton Live in 3 ways:

  1. Native Control Surface (VR Console for Ableton’s built-in mixer)

  2. General MIDI Device (Map VR MIDI tools to anything in Ableton)

  3. Direct Connection to ControlRoom AU/VST3 Plugins (VR Spatial Mixer and Plugin Tablet)


Detailed Setup Instructions

Note

Please note, ControlRoom Hub must be running to maintain the connection with Ableton Live. It can be minimized, but not closed.

Use the VR Console to control the Ableton mixer

The VR console in ControlRoom is your home base for interacting with your Ableton session. It provides access to Ableton’s built in Volume, Pan, Solo, Mute, and Sends. You can navigate through the tracks in your session using the Nudge and Bank buttons, and control the main functions of the Ableton transport. You’ll also find basic Play and Stop transport control on top of your left wrist!

Expand
titleStep One: Turn on the Console tool from the menu

In VR, press the menu button on your left controller to bring up the menu, then select the Tools page, and turn on the Console.

Expand
titleStep Two: Use the Console to control your Ableton session

By using the various sections of the console, you can control Ableton’s built in mixer. Functions outlined below:

Ableton Parameter

Console Control

Volume

Large Fader

Pan

Pan Knob

Solo

S button

Mute

M button

Sends

Select Channel Mode A-E for sends 1-5. This will switch each track’s large fader to control the send level.

(Select Vol to return to normal console mode.)

Master Volume

Master fader at the far right side of the Console

Transport

Transport section at the front of the console.

Play and

...

Stop can also be controlled at any time using the large transport button on your left wrist

FF and RW will jump between Ableton marker points

Record will start recording. (if automation record is turned on in Ableton, any control movements will write automation in Ableton)

Spatial Mixer and Plugin Tablet

Image Modified

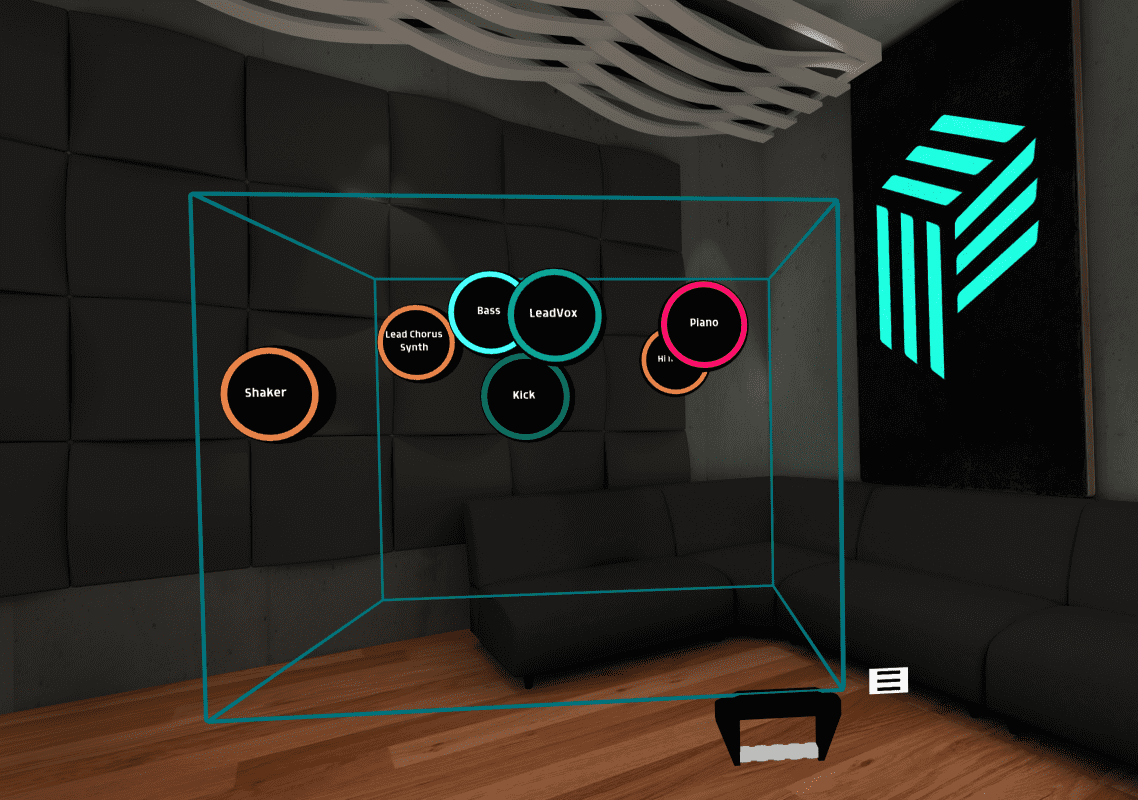
Every instance of the ControlRoom Channel AU/VST3 plugin can be controlled from VR with the Spatial Mixer and Plugin Tablet. This provides powerful control over the plugin from within VR, including the Compressor, EQ, Spatial Panner, and output level.

The ControlRoom Channel and Master plugins are available for purchase from persp3ctive.com

Image Added
Image Added

Tip

You can read more about the sonic goals of the plugins, and the thought and considerations that went into their development here.

Expand
titleStep One: Insert ControlRoom Channel on your tracks in Ableton

Once you have launched your DAW and opened a session file, you’ll need to add an instance of ControlRoom Channel to any and every track that you’d like to control with the Spatial Mixer or Plugin Tablet. We recommend adding it as the last insert in your plugin chain, so that parameter changes in ControlRoom Channel will not affect any processing coming afterwards.

Image Modified

Expand
titleStep Two: Insert ControlRoom Master on your Ableton master track

Insert only one instance of ControlRoom Master onto your Master track in Ableton. The master volume will be controllable via the Master Fader on the VR Console.

Info

ControlRoom Master is designed to be inserted only one time in your session - on your master output. This is because it is the source of timecode, bar|beat information, and master output level metering in ControlRoom VR. If you add more than one instance of ControlRoom Master to your session, proper display of these functions in VR cannot be guaranteed.

Image Modified

Expand
titleStep Three: Open the Spatial Mixer in VR
  • In VR, press the menu button on your left controller to bring up the menu, then select the Tools page, and turn on the Spatial Mixer.

  • Press the menu button at the lower right of the Spatial Mixer, then toggle on any tracks you’d like to control with the Spatial Mixer. Close this menu when you are finished, and return back to it any time you’d like to display different tracks.

  • Move each track sphere up/down for volume, left/right for panning, and front/back for Proximity.

Image Modified
Expand
titleStep Four: Turn on the Plugin Tablet
  • In VR, press the menu button on your left controller to bring up the menu, then select the Tools page, and turn on the Plugin Tablet.

  • Press the menu button at the top right of the tablet to select the track you’d like to control with the Plugin Tablet. Close this menu when you are finished, and return back to it any time you’d like to display different tracks.

  • Use the buttons along the top of the tablet to switch between Compressor and EQ control over the selected track.

EQ Control

  • Each of the 10 bands of the EQ will appear front to back as colored lines.

  • The white line at the rear is the overall EQ curve, summed from the combination of the 10 adjustable bands.

  • Individual bands can be toggled on/off using the X or A button when hovering over each point, or while grabbing it with the trigger.

  • Each EQ band’s point can be moved up/down for Gain and left/right for Frequency.

  • Push the joysticks up/down while grabbing a point to adjust that band’s Q value.

Compressor Control

  • All parameters of the Channel compressor are shown here.

  • Toggle pyramid on/off by selecting the pyramid icon at the top right of the tablet.

  • The pyramid allows you to control Ratio, Threshold, Attack Time, and Release Time

    • Height of the tip of the pyramid for Ratio

    • Height of the middle line for Threshold

    • Horizontal position of the bottom left and right sides for Attack Time and Release time, respectively.

Map ControlRoom Midi Tools to any parameter in Ableton

There are numerous tools in ControlRoom that can be mapped to control any parameter in Ableton, including your favorite third party plugins. Follow the steps below for an example of how to map the FX Cube to a few plugin parameters in Ableton.

Info

It’s helpful here to use Command-Tab (Mac) or Alt-Tab (Windows) to quickly switch back and forth between the Hub and Ableton windows.

Expand
titleStep One: In the Hub, open the Tools page and click the FX Cube tool
Image Modified

Expand
titleStep Two: In Ableton, add Audio Effects or plugins of your choice

For this example, let’s first add a simple drum loop to an audio track in Ableton. For simplicity, choose “80s Beat-90bpm.wav”, a sample included with Ableton Live.

Image Modified

Next, add a Grain Delay and a Reverb to this same track.

Image Modified

Expand
titleStep Three: In the Hub, name the XYZ axes with the intended parameters

For this example, label them as follows:

  • Name: “Drum FX”

  • X Axis: “Grain Pitch

  • Y Axis: “Grain Freq

  • Z Axis: “Reverb Dry/Wet

Image Modified

Expand
titleStep Four: Put Ableton in Midi Map mode, and map the parameters
  • Back in Ableton, switch to Midi Map mode by clicking the MIDI button at the top right of the Ableton window, or by using the keyboard shortcuts Command-M (Mac) or Control-M (Windows)

  • Click the Pitch parameter in the Grain Delay window. This selects it with a rectangle.

  • Switch back to the Hub, and click the first Send CC button to map the X axis to Grain Delay Pitch

  • Switch back to Ableton, and click the Frequency parameter in the Grain Delay Window to select it

  • Switch back to the Hub, and click the second Send CC button to map the Y axis to Grain Delay Frequency

  • Follow suit to map the reverb.. In Ableton, click the Reverb Dry/Wet parameter to select it, and in the Hub click the third Send CC button to map the Z axis to Reverb Dry/Wet

  • In Ableton, you should now see three items in the Midi Mappings panel on the left.

    • If you do not, please review the previous steps to be sure you haven’t missed anything.

  • Exit Midi Map mode by clicking the MIDI button at the top right of the Ableton window, or by using the keyboard shortcuts Command-M (Mac) or Control-M (Windows)

Image Modified

Remember to press the PURPLE panel when Midi mapping. For example, if you are MIDI-mapping pitch in the Grain-Delay, press the box that includes the current pitch, not the box that says, “Pitch.”

Expand
titleStep Five: Open the FX cube in VR and have fun

Once you have mapped the three parameters, this mapped tool will be available to you in ControlRoom VR.

  • In VR, press the menu button on your left controller to bring up the menu, then select the Tools page, and turn on the FX cube you just mapped, which should be named Drum FX

  • Start playback either on the Console, or using your left wrist transport

  • Move the ball in the FX cube around to control all three of those parameters simultaneously

Expand
titleStep Six: Save your ControlRoom Hub session
Note

We recommend that you save your ControlRoom Hub session early and often any time you are mapping midi tools to Ableton.

Note

We recommend that you save your ControlRoom Hub session early and often any time you are mapping midi tools to Ableton.


TL;DR

  1. Ensure you have completed all the steps in the setup process

  2. Use the VR Console to control Ableton’s built-in mixer

  3. Use the VR Spatial Mixer to control the Channel and Master AU/VST3 plugins

  4. Use the Hub to manually map MIDI tools to control anything in Ableton

Have more questions about this process? Check out our FAQ page.

Info

Still have questions about setting up the Hub or have suggestions about how we could improve this page? Try our customer service portal.

Filter by label (Content by label)
showLabelsfalse
max5
spacescom.atlassian.confluence.content.render.xhtml.model.resource.identifiers.SpaceResourceIdentifier@105c4
showSpacefalse
sorttitle
typepage
labelskb-how-to-article
cqllabel = "kb-how-to-article" and type = "page" and space = "CRS"
Page Properties
hiddentrue

Related issues